
 10037
10037
This document, and the content contained herein, is intended for customers, users and other persons with the operation and features of the covered Hegla products. While Hegla makes every effort to include accurate and useful information, it is not possible to anticipate or address every possible situation or to account for conditions at unknown locations or interactions with unknown systems or components. Therefor, these documents must be used only for informational purposes and used in conjunction with best practices and with due care. Hegla shall not be responsible for any injuries or losses that occur as a result of the information in this document. Moreover, as products and offerings change over time, the usefulness of the information in this document may become obsolete. It is the responsibility of the reader or consumer to ensure that the information contained herein is timely and reflects the current reality of Hegla products and offerings. Hegla disclaims any and all warranties regarding the information in this document.
***Read chapter 1 of your operators manual before undertaking any work in the area of the servo motor and drive equipment.***
When in doubt please contact Hegla service before taking action (404) 763-9700

C axis alignment test
Use the hand entry function of the machine to make a cut plan that resembles the following shape. If you need to learn how to make a cut plan see video How to Create a Cut Plan using Hegla Cut. The shape is a series of 1-inch wide strips in two directions. The length of the strips is not significant, but usually about 24 inches. It should not include edge deletion. The glass should be no thicker than 6 mm. Your place should look similar to the plan below.

After the machine finishes the cut, examine the shapes. If all the strips have a width of 1 inch then the C axis is OK. If the strips width alternate between more than and inch in width and less than an inch in width then the C axis may need to be adjusted. You may also have something bent within the cutting head (I.E. Pillar post, cutting head shaft, bolt that holds pillar post to shaft or the mesh between rack and pinion is not good).
Commonly bent part is the bolt that holds pillar post to shaft:

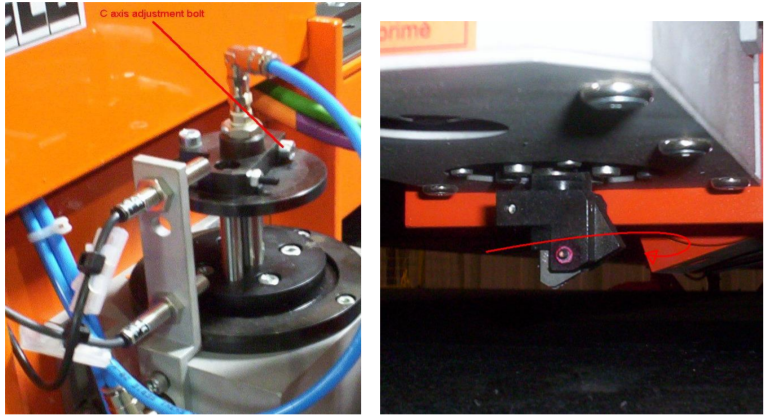
C axis Adjustment
The best way to adjust the C axis is mechanically. First we need to determine the direction and amount of error in the C axis. To make more accurate observation, we need to temporally slow the Optimax speed. This is accomplished by navigating the Optimax’s HMI to the Diagnostics screen by following the steps below:
- Log into the Service login from the Operator HMI: Service (Shift+F3), Service Hegla (Shift+F1)
- There is no password, just click the green check mark. If it asks for a password enter the password "STDMMI"
- You may have to click anywhere on the screen, before pressing F12 to go to the Diagnostic screen
- You can increase the machine speed with Shift+F6 for "Override +"
- You can decrease the machine speed with Shift+F7 for "Override -"
- You can click and drag with the mouse on either of the override buttons to change the speed.
Once there decrease the machine speed to about 30%. Next you must enter a cut plan that causes the machine to make long straight scores. Once the machine starts the cut plan observe the orientation of the cutting wheel holder. It should be pointing in the direction of the cut. See drawings below.
Correct C axis alignment

If the Optimax has a bad C-axis alignment, then it can be adjusted mechanically or via software offsets. Make note of the C axis, and wait for the Optimax to return to the home position.
Mechanical C axis adjustment
To adjust the C axis, loosen the C axis adjustment bolt and twist the cutting wheel holder to the position that will allow the cutting wheel holder to point in the direction of the cut.
Software C Axis Adjustment
To adjust the C-axis via and offset through the software you must put the machine into and emergency stop. Then go inside the gate and rotate the cutting head by hand to the position you would like it to be. An easy way to get it correct the first time is to use a right angle as shown below.

Now follow the steps below:
- Log into the Service login from the Operator HMI: Service (Shift+F3), Service Hegla (Shift+F1)
- There is no password, just click the green check mark. If it asks for a password enter the password "STDMMI"
- You may have to click anywhere on the screen, before pressing F12 to go to the Diagnostic screen
- Press Machine Data F6, Edit Machine Data F6
- A pop up window should appear.
- On the left side of the pop up window you need to search for MK_GRUNDOFFSET and click on it
- Once clicked you will see values appear to the right of the pop up window in the white box area.
- The bits in the white box area for MK_GRUNDOFFSET are as follows:
0=X-axis
1=Y-axis
2=C-axis
3=Z-axis (option)
4=U-axis (option)
- Click on the one for C-axis (once clicked it will show you the bit it is, so make sure it shows a 2 next to it once clicked)
- You now need to take the ACTUAL encoder count you have for the C-axis (displayed behind the pop up window in the top left of the HMI) and add/subtract the actual position of the C-axis from the value you have in bit 2 for MK_GRUNDOFFSET.
- Once you have your new value you need to change the offset in MK_GRUNDOFFSET bit 2 to this new value. Once entered you must press the enter key on the keyboard first and then click the green check mark to save the offset. Your encoder value for C-axis after making the changes should change to 0.000 ACTUAL encoder count. If the C-axis actual encoder count does not go to 0.00 then you have entered the wrong value for C-axis Grundoffset. Now test again with the strip test at the beginning of the document.
***When in doubt and the machine is operational, please contact Hegla service before taking action***


